Cabinet Type
What it is: the starting arrangement for the cabinet. Choose the closest supported type, then customise its construction.
- Options
- Base, Wall, Tall / Larder, Drawer, Sink, Appliance and Custom cabinets.
- When to use it
- Use the named type when it matches the intended role; use Custom when you need a general carcass starting point.
- What it changes
- Available controls and the starting front or internal arrangement. It is not merely a display label.
- Example
- Choose Drawer Cabinet for a bank of drawers rather than adding drawer fronts to an unrelated preset.
Dimensions
What it is: Width, Height and Depth are the finished outside cabinet dimensions. Measure the available space and allow any installation clearance yourself.
- Options
- Metric or imperial display and entry; millimetres remain the exact internal manufacturing unit.
- When to use it
- Set these first because most panel sizes and internal spans depend on them.
- What it changes
- Carcass geometry, fronts, shelves, drawers, plinth, cut list, drawings and revision identity.
- Example
- A 600 × 720 × 560 mm entry describes the finished outside width, height and depth—not the internal opening.
Back Construction
What it is: the panel arrangement that closes or leaves open the rear of the cabinet. It also establishes the rear usable datum—the line from which usable internal depth is measured.
- No Back
- Leaves the rear open. Use only when the installation or design genuinely does not need a back.
- Applied Back
- A back fixed to the rear of the carcass. Its face sits behind the carcass and does not move the internal rear line forward.
- Recessed / Rebated Back
- A back set into the carcass. The usable rear datum moves forward to the appropriate inside face after the recess or service space is allowed for.
- Example
- A shelf in a recessed-back cabinet starts at the resulting rear usable datum, not at the outside rear edge.
Workshop / Advanced Note
Groove, rebate and back-fitting dimensions must match the selected construction and workshop process. Do not infer a cutter setting from the preview alone.
Shelves
What it is: horizontal storage panels inside the usable cabinet compartment.
- Fixed
- A shelf intended to be permanently joined or fixed at its chosen height.
- Adjustable
- A movable shelf supported by suitable shelf pins or supports; follow the selected support instructions.
- Full Depth
- Extends from the rear usable datum to the usable front extent.
- Custom Depth
- Always measured from the rear usable datum forward. Any unused depth remains at the front, not behind the shelf.
- Example
- With 540 mm usable internal depth and a 400 mm shelf, the shelf occupies the rear-most 400 mm and leaves 140 mm clear at the front.
Top Construction
What it is: the parts that close or brace the top of the cabinet.
- Full top panel
- Closes the entire top of the carcass.
- Two Support Rails
- Uses separate front and rear rails. The approved starting width is 100 mm and can be changed as a manufacturing dimension.
- No top
- An explicit construction choice for an appropriate installation; it is never implied.
- What it changes
- Canonical parts, material quantities, connections, cut list, drawings and revision identity.
Plinth / Toe Kick
What it is: the base area beneath a supported cabinet. Height sets the vertical plinth zone. Setback is measured backwards from the cabinet front to the front face of the plinth.
- When to use it
- Use it where the cabinet needs a recessed toe space, panel plinth or leg-supported plinth zone.
- What it changes
- Plinth geometry, visible panels, 3D preview, cut list and manufacturing outputs.
- Example
- A 50 mm setback places the plinth front face 50 mm behind the cabinet front datum.
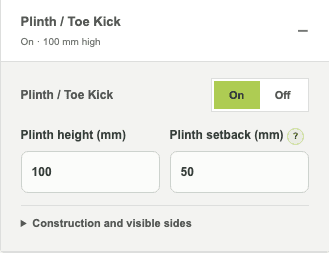
Actual staging plinth controls.
- Switch the plinth on
- Finished plinth height
- Setback from the cabinet front